Visual imagery is essential for memory, day dreaming and imagination. It can also be used as a powerful classroom tool and, when embedded in the writing process, can produce amazing results.
I originally discovered this technique a few years ago during a training course led by the CLPE. I am a big fan of their pedagogy and style of teaching – their planning sequences are aimed at developing an appreciation of art and language, with a strong emphasis on spending time exploring and responding to illustrations. It was at the CLPE that I learned about the importance drawing and visualisation as part of the writing process.
What is visualisation?
Visualisation is quite simply the creation of a mental image in the mind’s eye. It is the act of closing your eyes and trying to imagine something; this could be a character description from the book you are reading, or your own setting in a fictional world.
Visualisation for reading comprehension
Fluent readers naturally create mental images while they read. These images emerge from the senses, as well as emotions, and are often anchored in a reader’s prior knowledge and experiences. However, it may not come naturally to all children.
Teacher modelling of the thought processes involved in visualising is key. As you read a short extract of a fictional story or poem aloud, describe the images that you see in your own mind. Then engage the children by asking them what they had imagined. Try to frequently include questions and discussion around visualisation during your reading sessions, for example:
- When you were reading this part of the story/poem, did you visualise anything?
- Tell me about what you could see?
- What was it that made you envisage that? (key words/language, connections made, past experiences, prior knowledge)
- Was there a particular word or phrase that made you imagine that?
- How do the images created help you to understand the story?
Visualisation and Art
Many writer-teachers understand the value of art as a form of pre-writing – to help children to generate ideas and put pen to paper – but visual imagery can also have a powerful impact on reading comprehension, allowing children to delve much deeper into a text.
Try reading an extract from the text you are studying (this works really well for character and setting descriptions) and simply allow children to close their eyes and imagine what something looks, feels, smells, sounds or tastes like. Prompt them by talking them through the process. For example:
“I am going to read the first page of our new book, listen carefully. Think about the words you hear. See if you can imagine the scene the words describe. As you listen, when you hear descriptive or figurative language, use those words to help paint an image in your mind.”
In this example, my chosen text was The King of the Sky by Nicola Davies (the CLPE has excellent planning for this book here). The book begins with just 4 sentences.

I read the description again and again, allowing the children to absorb the language and generate images in their own minds. Then I allowed time for the children to draw, paint or use some other medium to communicate what they saw on paper. I kept reading the text aloud, whilst they worked on their art.
Then, I displayed the text on the board for them to refer back to and gave the children ample time to discuss and compare their illustrations, noticing and questioning any similarities or differences.
“Oh that’s an interesting use of colour, what made you choose that?”
“Well, it said that the houses were huddled and smoke was coming out of the chimneys so I thought they would be warm and cosy so I used red and yellow for the houses.”
“Was there any particular language that made you draw that?”
“It said there were metal towers clanking so I just drew these.”
“Why are there no people in your illustration?”
“Well, it didn’t really mention anyone (apart from the person whose voice it is). It seemed like a bit lonely or something.”
Finally, you might also ask children to refer back to the text and write down any key words or phrases that helped them to imagine the scene or character (this could even be done with post-its). Once again, this makes them think more deeply about the language used as they annotate their illustrations, attributing words and phrases to particular images. Although there are only 4 sentences, there is a lot that can be drawn from these 5 lines. I would use this text with UKS2 and we’d look at the use of repetition, alliteration, personification, onomatopoeia and metaphors to name but a few!
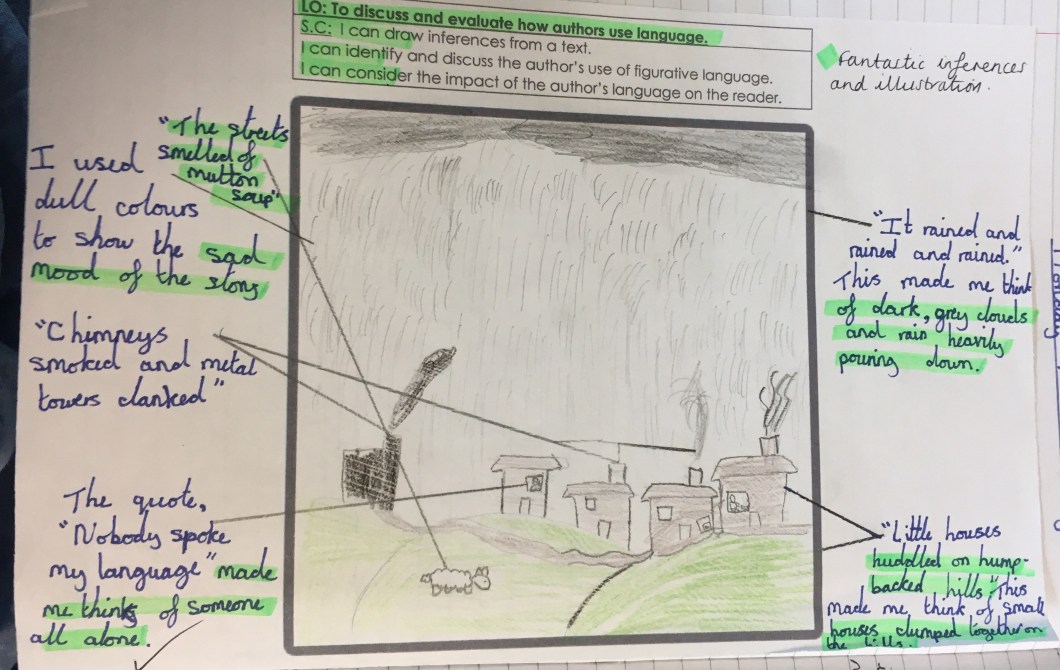
By honing in on the language used, this helps the children to understand the text in much more detail. We’d also take the opportunity to explore vocabulary such as ‘mutton soup’ and ‘coal dust’ and make predictions about where this setting might be. Putting the language under the microscope in this way also allows them to consider the effect on the reader and the authorial intent behind particular word choices. At this stage, the children are already thinking about the senses, descriptive language, figurative language and word choices prior to starting their own writing.
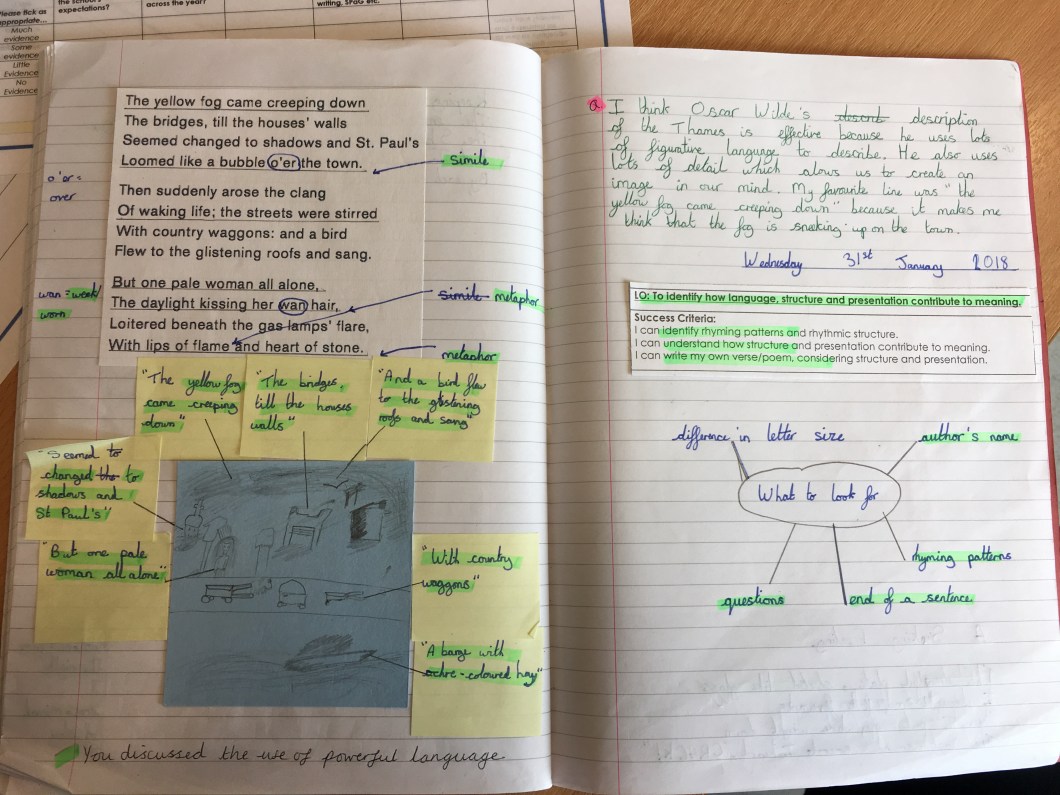
Here’s another example (using poetry). You can see that the child has been extended to write a paragraph about whether or not the author’s descriptive language is effective.
Finally, you might like to reveal the original illustration that accompanies the text and allow the children time to discuss whether it’s what they were expecting, whether they notice anything different or interesting, whether they can make connections between the text and the illustrations. This could lead to further predictions or inferences about the story and, ultimately, to the children writing their own story inspired by the text.

Visualisation as part of the Writing Process
Visualisation as part of the idea generation, pre-writing stage can help lead to incredible writing. When drawing or art is part of the writing process, the picture in the writer’s mind becomes tangible. Here, we used charcoal to illustrate the character description from A Monster Calls by Patrick Ness as a stimulus for writing.
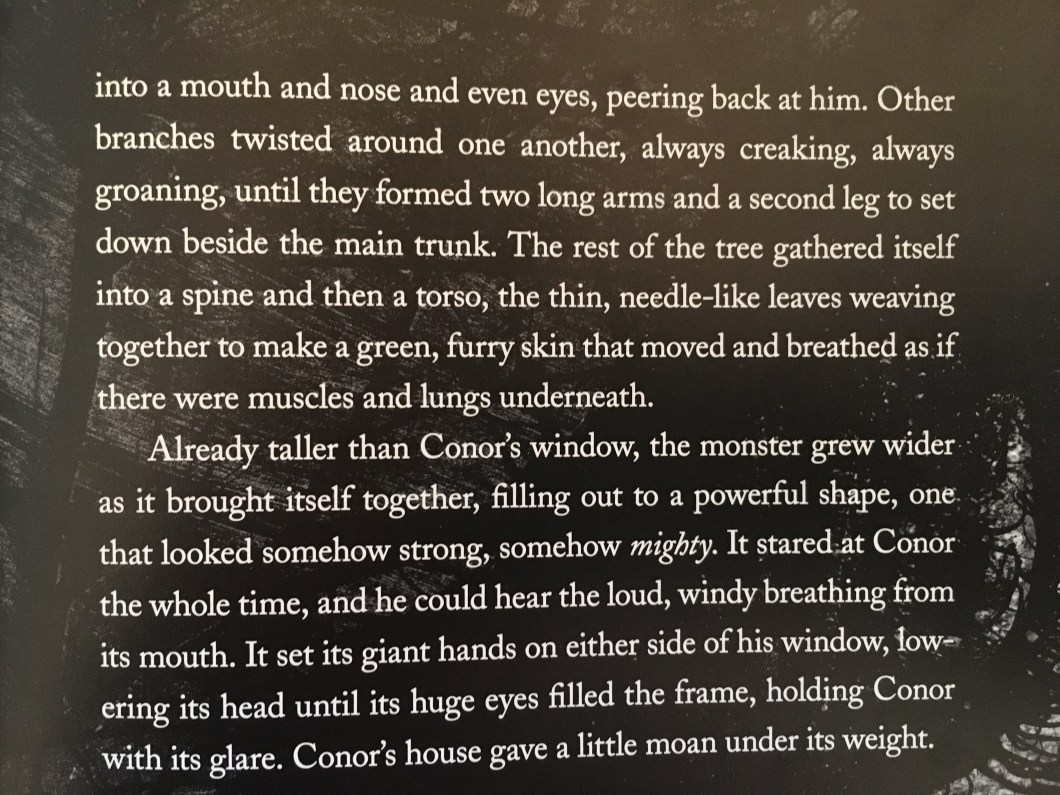
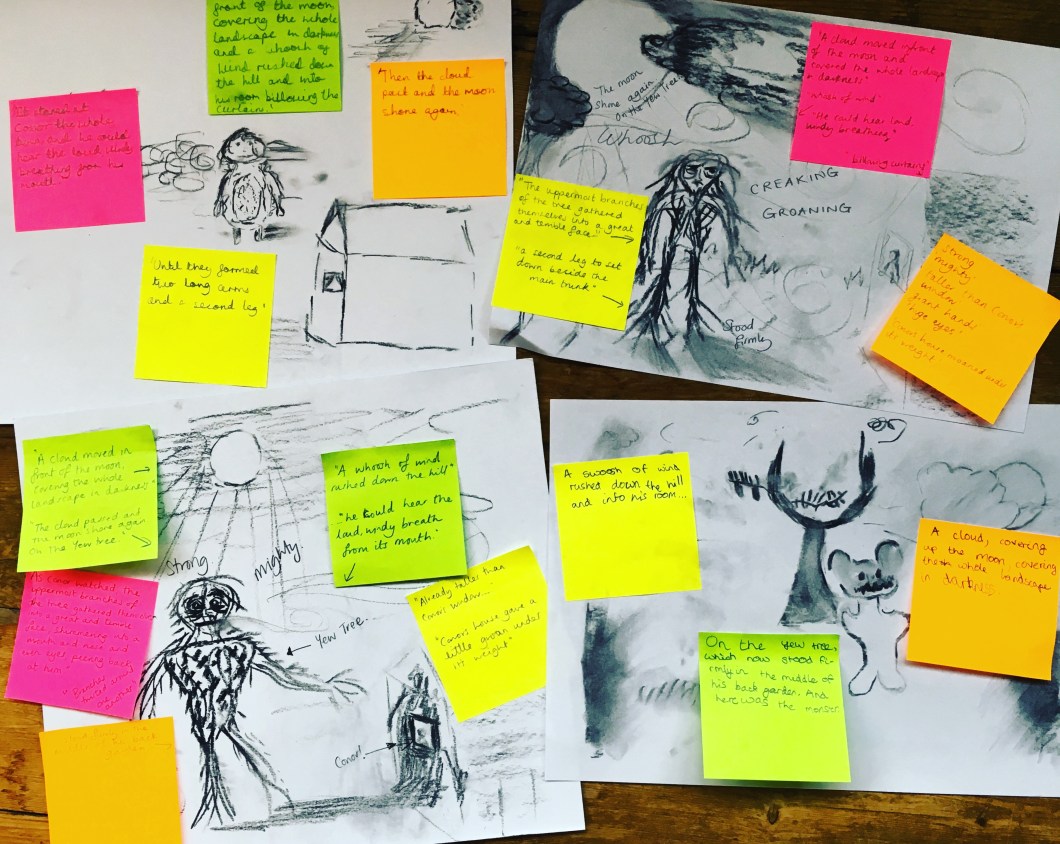
We then interrogated the language in detail (and compared it to a description of The Iron Man and the use of verbs peppered throughout the character description of Skellig) before allowing time for the children to bring their own characters and settings to life through illustration. Allowing time for drawing/visualisation before writing will focus their attention on the details – the five senses, what a character is like, how they behave, what they say. As they add details to their illustrations, they will simultaneously be adding detail to their idea of what their character will be like, or what will happen in this particular setting. They could even be encouraged further to add annotations or jot down ideas and phrases to help them build their ideas, readying them for the writing process. We also generated a success criteria based on what we thought made the character descriptions effective. This was then displayed on the working wall.
The use of this simple classroom tool becomes the palette and canvas with which to write. After using visualisation at the beginning of the writing process (as well as lots of reading, vocabulary exploration and word play), children’s writing will inevitably begin to include increasingly vivid detail as they try to communicate their own ideas in a more precise and meaningful way.
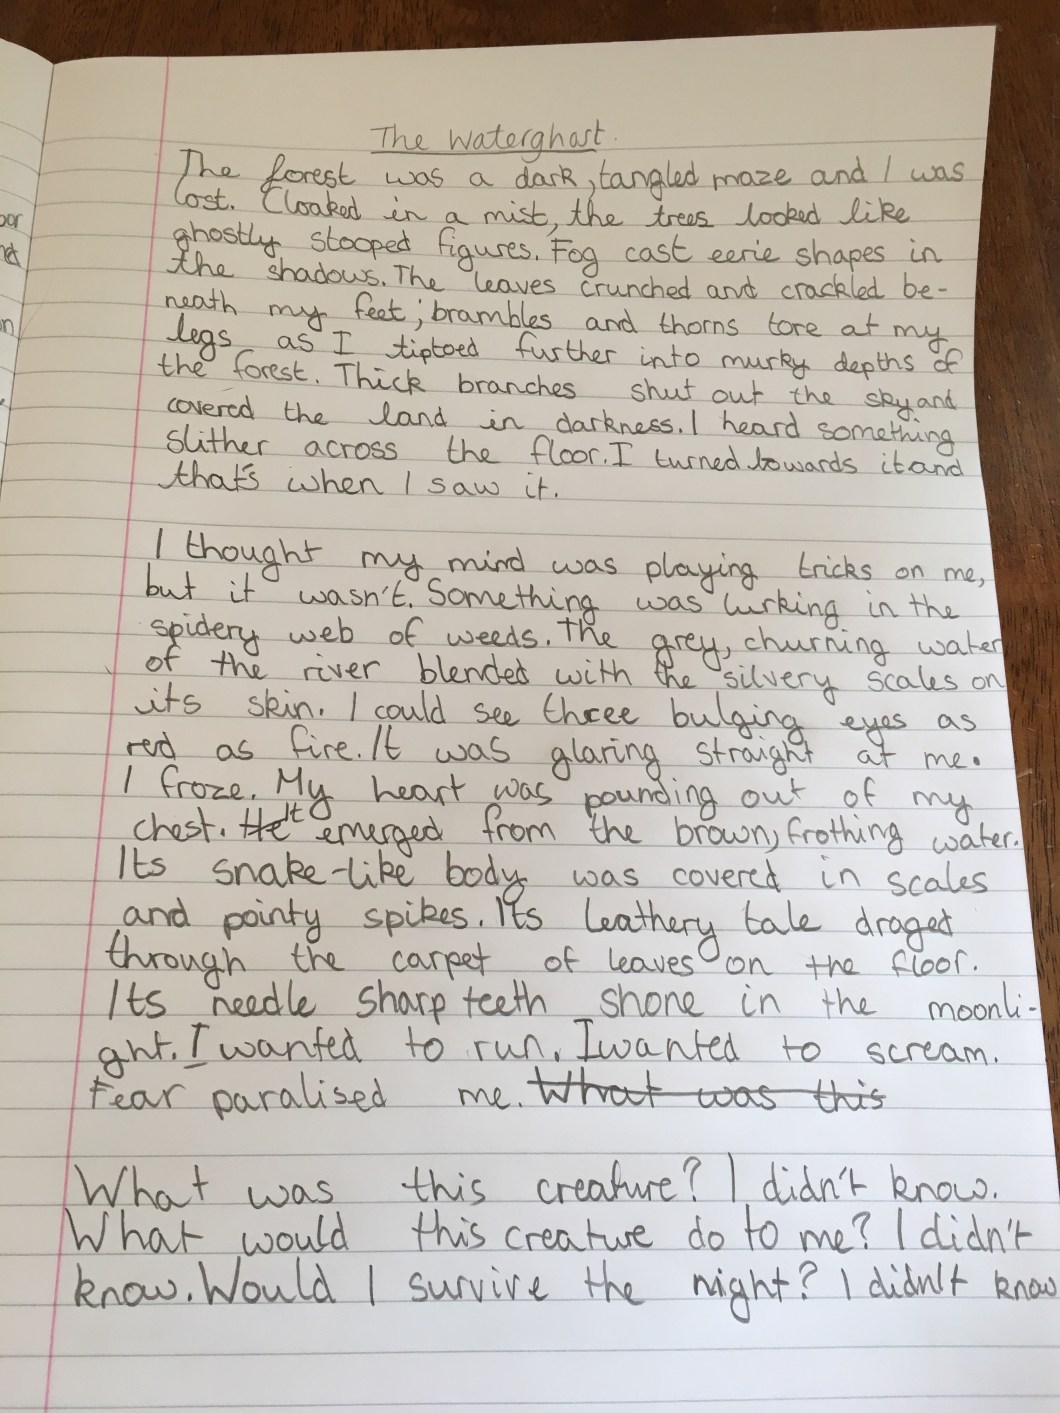
Here is an example of descriptive writing by a Year 5 child:
Visualisation and Conferencing
I have also used visualisation during the revision stage of the writing process. Allow time for children to read aloud their own descriptive writing to a partner during a peer-to-peer writing conference. Their partner will then sketch out the image that they see in their mind’s eye. This will allow them to discuss whether this was the intended image that the writer was trying to communicate and, if not, it will allow them to discuss how detail could be added to alter the visual imagery created. Drawing provides the ability to see their character or setting more clearly, before they they go back to revise their thinking and their writing.
Other ideas…
- Set visualisation tasks for homework and request that parents read an extract aloud, whilst the children draw or paint what they see.
- Focus on maps and how these can help us understand a story or generate ideas for our own stories in an imaginative and creative way.
- Visualisation could be used as an intervention tool to support less able readers and/or writers
- Use props and ask children to visualise something else that they could be to generate ideas and support writing. Shells are fantastic for this sort of thing. For example, ‘It’s not a shell, it’s the broken wing of an angel who has fallen to Earth’. This would make a great story starter or poem!
Using visualisation and art in a more purposeful way will help children to become more in tune with the books that they are reading because they will be able to visualise what the author is saying. It also encourages them to focus on the language used and the impact that it had on them as the reader; this enables them to envisage the world of the story or poem and also provides invaluable support for their own writing later on. The power of visualisation cannot be underestimated!
